Ghost Mannequin Photography: Complete Guide for Apparel Sellers (2025)
📑 Table of Contents
- What Is Ghost Mannequin Photography?
- Why Ghost Mannequin Photography Works
- Ghost Mannequin vs Other Photography Styles
- Equipment You Need (Budget & Pro Setups)
- Step-by-Step Ghost Mannequin Photography Process
- Photo Editing: Creating the Invisible Effect
- Common Mistakes and How to Avoid Them
- Ghost Mannequin Photography for Different Garments
- Outsourcing vs DIY: What's Better?
- Best Tools and Resources
- Real Success Stories
- Frequently Asked Questions
- Conclusion
What Is Ghost Mannequin Photography?
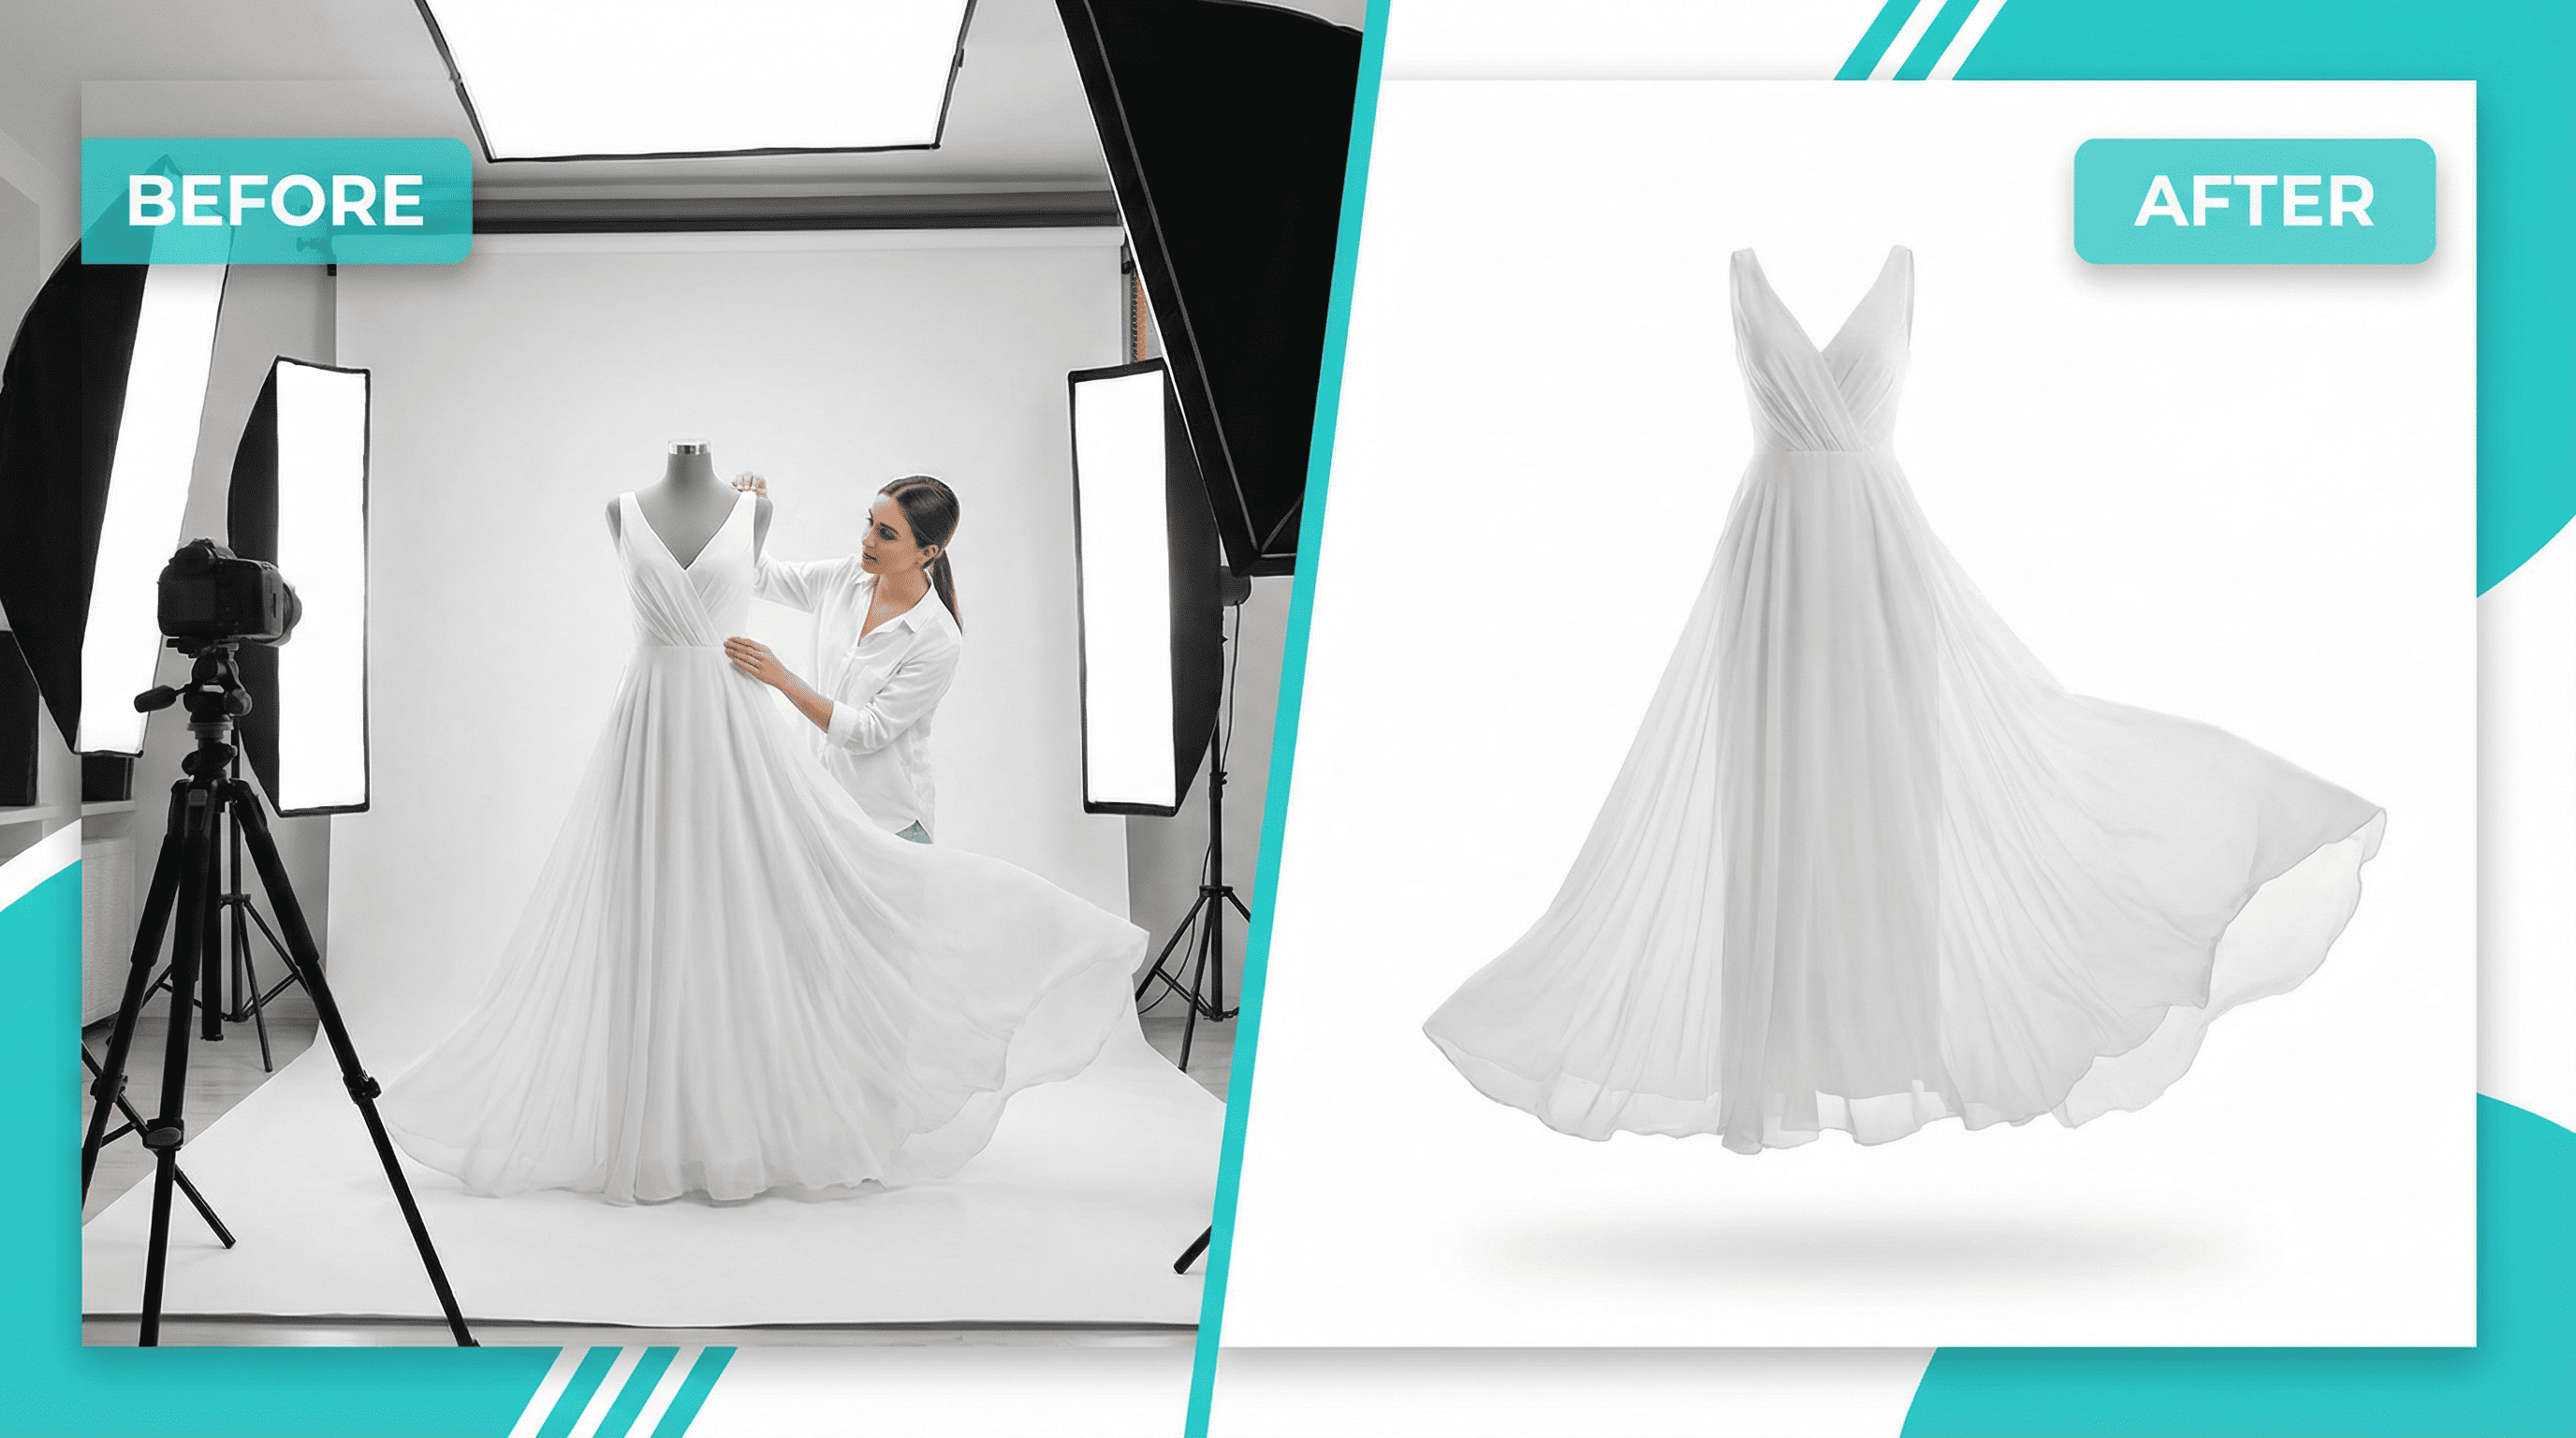
Ghost mannequin photography (also called invisible mannequin or hollow man photography) is a technique where clothing is photographed on a mannequin, then the mannequin is digitally removed in post-production.
The result? A 3D hollow effect that shows:
✓ Natural garment shape and fit
✓ Front, back, and inside details
✓ Professional studio-quality appearance
✓ Fabric drape and structure
✓ Neckline, collar, and sleeve details
How It Works (Simple Explanation):
- Shoot 1: Photograph garment on mannequin (front view)
- Shoot 2: Remove garment, photograph inner neckline/label separately
- Editing: Combine images and remove mannequin digitally
- Result: Garment appears to be worn by invisible person
This technique is the gold standard for:
- E-commerce marketplaces (Amazon, Flipkart, Myntra)
- Fashion brand websites
- Lookbook catalogs
- Wholesale product listings
- Social media product posts
💡 Industry Insight: 78% of top-selling fashion brands on Amazon use ghost mannequin photography for their main product images.
Why Ghost Mannequin Photography Works
1. Higher Conversion Rates (38% Increase)
Customers can visualize fit and shape better than flat-lay images. Studies show ghost mannequin photos increase purchase likelihood significantly.
2. Professional Brand Perception
Creates consistency and premium feel across your entire product catalog. Customers perceive brands using this technique as more established and trustworthy.
3. Cost-Effective Scalability
Once setup is complete, you can photograph unlimited products at minimal cost. No repeated model fees or scheduling hassles.
4. Marketplace Compliance
Meets Amazon, Flipkart, and other marketplace requirements for apparel main images (white background, no visible models).
5. Shows Product Details Clearly
Reveals neckline, collar, buttons, stitching, and garment construction—details customers need to make purchase decisions.
6. Faster Production Time
Photograph 20-30 products per day once you master the technique. Much faster than coordinating model photoshoots.
7. Better Mobile Experience
Clean, focused product images display perfectly on mobile devices where 70% of shopping happens.
Ghost Mannequin vs Other Photography Styles
| Style | Cost/Product | Time | Conversion Rate | Best For |
| Ghost Mannequin | ₹200–500 | 15 min | High (38% boost) | E-commerce, catalogs |
| Model Photography | ₹1,000–5,000 | 2-5 days | Highest (lifestyle context) | Brand campaigns, premium products |
| Flat Lay | ₹100–300 | 5 min | Medium | Social media, casual brands |
| Hanger Photography | ₹50–200 | 3 min | Low | Budget listings, wholesale |
| AI Photography | ₹50–150 | 10 min | High | Fast scaling, variations |
Verdict: Ghost mannequin offers the best balance of cost, conversion rate, and professional appearance for most fashion sellers.
Equipment You Need
Budget Setup (₹8,000–15,000)
Essential Equipment:
| Item | Cost | Purpose |
| Mannequin (adjustable) | ₹2,500–5,000 | Display garment with shape |
| Smartphone (12MP+) | Already owned | Capture high-res images |
| Tripod | ₹800–2,000 | Consistent angles, stability |
| White backdrop (6x8 ft) | ₹1,200–3,000 | Pure white background |
| LED light panels (2x) | ₹2,500–5,000 | Even, shadowless lighting |
| Clamps/tape | ₹200–500 | Adjust garment fit |
| Photo editing software | Free (GIMP) or ₹1,675/mo (Photoshop) | Remove mannequin |
Total Budget Setup: ₹8,000–15,000
Professional Setup (₹35,000–60,000)
Advanced Equipment:
| Item | Cost | Purpose |
| Professional mannequin set | ₹8,000–15,000 | Multiple sizes, detachable parts |
| DSLR/Mirrorless camera | ₹15,000–30,000 | Superior image quality |
| Photography lighting kit (3-point) | ₹8,000–15,000 | Professional studio lighting |
| Seamless white backdrop system | ₹3,000–6,000 | Clean, wrinkle-free background |
| Light modifiers (softboxes) | ₹3,000–5,000 | Soft, diffused lighting |
| Camera remote trigger | ₹800–1,500 | Hands-free shooting |
| Adobe Photoshop subscription | ₹1,675/month | Professional editing |
Total Professional Setup: ₹35,000–60,000
Mannequin Selection Tips:
✓ Adjustable torso - Fits multiple sizes
✓ Detachable parts - Easier garment placement
✓ Neutral color - White or gray (easy to remove digitally)
✓ Collapsible shoulders - For tops and dresses
✓ Sturdy base - Stability during shooting
Recommended Brands: Bonito, Retail, Amazon Basics mannequins
Step-by-Step Ghost Mannequin Photography Process
Phase 1: Studio Setup (15 minutes)
Step 1: Position White Backdrop
- Hang seamless white paper or fabric
- Create smooth curve from wall to floor (no visible corner)
- Ensure no wrinkles or creases
- Secure with clamps or tape
Step 2: Set Up Lighting
- Place two LED panels at 45° angles to mannequin
- Equal distance from subject (3-4 feet)
- Adjust height to mannequin chest level
- Eliminate harsh shadows on background
Step 3: Position Mannequin
- Center mannequin on backdrop
- 2-3 feet from background (prevents shadow)
- Face directly toward camera
- Ensure stable base
Step 4: Camera Setup
- Mount camera/smartphone on tripod
- Position at mannequin chest height
- 6-8 feet distance from mannequin
- Enable grid lines for alignment
- Set to highest resolution
Phase 2: Garment Preparation (5 minutes)
Step 5: Dress the Mannequin
- Steam garment to remove wrinkles
- Place on mannequin carefully
- Adjust shoulders and sleeves naturally
- Button/zip completely
Step 6: Style and Adjust
- Use pins/clips on back to create fitted look
- Smooth out fabric wrinkles
- Arrange collar and neckline perfectly
- Ensure symmetry (both sleeves equal)
- Check that garment is centered
💡 Pro Tip: Pin excess fabric at the back (invisible in front photo) to create tailored, fitted appearance.
Phase 3: Photography (10 minutes)
Step 7: Front View Shot
- Frame garment filling 85% of image
- Ensure bottom of garment is visible
- Check alignment using grid
- Take 3-5 shots (backup options)
- Verify focus and exposure
Step 8: Back View Shot
- Rotate mannequin 180°
- Maintain exact camera position
- Same framing and lighting
- Capture back design details
- Take 3-5 shots
Step 9: Inside Neckline/Label Shot
- Remove garment from mannequin
- Lay on white surface or hold
- Photograph inner neckline area
- Capture brand label clearly
- This will fill the "hollow" area in editing
Step 10: Detail Shots (Optional)
- Close-ups of buttons, zippers, embroidery
- Fabric texture shots
- Care label details
- Special features
Camera Settings (For DSLR Users):
| Setting | Recommended Value | Why |
| ISO | 100-200 | Minimal grain/noise |
| Aperture | f/8 to f/11 | Sharp focus throughout |
| Shutter Speed | 1/125s or faster | Prevents blur |
| White Balance | Daylight (5500K) | Accurate colors |
| File Format | RAW + JPEG | Maximum editing flexibility |
For Smartphone: Use portrait mode disabled, HDR off, highest resolution, manual focus if available.
Photo Editing: Creating the Invisible Effect
This is where ghost mannequin magic happens. You'll combine multiple photos and remove the mannequin digitally.
Software Options:
- Adobe Photoshop (Professional standard - ₹1,675/month)
- GIMP (Free alternative)
- Photopea (Free browser-based)
- Remove.bg + Photoshop (Hybrid approach)
Step-by-Step Photoshop Editing Process:
Step 1: Import Images
- Open front view image as base layer
- Import inside neckline shot as new layer
Step 2: Remove Background (Front Image)
- Select background using Magic Wand or Quick Selection
- Delete background or use Layer Mask
- Clean edges with Refine Edge tool
- Ensure pure white (RGB 255, 255, 255)
Step 3: Remove Mannequin
- Use Pen Tool to carefully trace garment outline
- Create selection around garment only
- Delete mannequin parts showing through fabric
- Clean up using Clone Stamp or Healing Brush
Step 4: Add Inside Neckline
- Position neckline/label layer inside garment opening
- Resize and rotate to fit naturally
- Blend edges using soft eraser
- Adjust opacity for realistic depth
Step 5: Create 3D Hollow Effect
- Add subtle inner shadow to neckline opening
- Create depth using gradient or soft shadow
- Ensure lighting matches outer garment
Step 6: Final Adjustments
- Color correction (if needed)
- Brightness/contrast optimization
- Sharpen details slightly
- Ensure pure white background
- Crop to square format (if for marketplaces)
Step 7: Export
- Save as high-resolution JPEG
- Minimum 2000x2000 pixels
- sRGB color mode
- File size under 10MB
⏱️ Time Required: 10-15 minutes per product (once proficient)
Quick Editing with AI Tools:
Automated Ghost Mannequin Creation:
Tools like Remove.bg, Claid.ai, and RACHAVO now offer AI-powered ghost mannequin editing:
- Upload front and neckline images
- AI automatically detects and removes mannequin
- Combines images intelligently
- Outputs marketplace-ready file
Time: 2-3 minutes
Cost: ₹20-100 per image
Quality: Good for most e-commerce needs
Common Mistakes and How to Avoid Them
❌ Mistake 1: Visible Mannequin Parts
Problem: Mannequin shows through sheer fabric or gaps
Solution: Use fabric inserts or additional editing to fill gaps
❌ Mistake 2: Inconsistent Lighting
Problem: Front and back images have different shadows
Solution: Don't move lights between shots; maintain setup
❌ Mistake 3: Wrinkled Garments
Problem: Fabric looks unprofessional with creases
Solution: Always steam garments before photography
❌ Mistake 4: Poor Pinning/Fit
Problem: Garment looks baggy or shapeless
Solution: Pin strategically at back for tailored appearance
❌ Mistake 5: Messy Background Removal
Problem: Rough edges, background not pure white
Solution: Use Refine Edge tool, check RGB values exactly
❌ Mistake 6: Unnatural Neckline Placement
Problem: Inside label doesn't match garment perspective
Solution: Pay attention to angle and size when compositing
❌ Mistake 7: Camera Position Changes
Problem: Different angles make editing difficult
Solution: Use tripod; never move camera between shots
❌ Mistake 8: Underexposure/Overexposure
Problem: Images too dark or washed out
Solution: Check histogram; aim for even exposure
Ghost Mannequin Photography for Different Garments
T-Shirts & Casual Tops
- Easiest category for ghost mannequin
- Photograph front, back, and inside neckline
- Pin at side seams for fitted look
- Show neckline style clearly
Dresses & Kurtis
- Use full-body mannequin
- May need additional side view
- Show dress length and flow
- Capture waistline definition
Formal Shirts
- Button completely
- Show collar stand properly
- Photograph cuff details
- Display placket and buttons clearly
Hoodies & Sweatshirts
- Position hood naturally (not flat)
- Show drawstring details
- Capture front pocket
- Display zipper if applicable
Sarees & Drapes
- Challenging - may need styling expertise
- Drape on mannequin traditionally
- Show pallu arrangement
- Capture border and design details
- Consider combining with model photos
Kids' Clothing
- Use child-sized mannequin
- Same process as adult garments
- Show fun details (pockets, prints)
- Include size reference in additional images
Outsourcing vs DIY: What's Better?
DIY Ghost Mannequin Photography
Pros:
✅ One-time equipment investment (₹8,000-15,000)
✅ Unlimited products at minimal cost
✅ Complete creative control
✅ Fast turnaround (no waiting)
✅ Learn valuable skill
Cons:
❌ Learning curve (2-3 weeks)
❌ Time investment in setup/editing
❌ Space needed for studio
❌ Initial quality may vary
Best for: Sellers with 50+ products, ongoing inventory, limited budget
Outsourcing to Professionals
Pros:
✅ Professional quality immediately
✅ No equipment investment
✅ No learning required
✅ Faster if shooting few products
✅ Consistent results
Cons:
❌ Recurring cost per product (₹200-500)
❌ Turnaround time (2-5 days)
❌ Less control over final output
❌ Expensive for large catalogs
Best for: New sellers with small catalog, one-time projects, premium brands
Hybrid Approach (Recommended)
Many successful sellers use a combination:
- DIY: Regular products, catalog updates, seasonal variations
- Outsource: Hero products, campaign images, complex garments
Or use AI editing tools to handle the difficult editing part while shooting in-house.
Best Tools and Resources
Photo Editing Software
| Tool | Type | Cost | Best For |
| Adobe Photoshop | Professional | ₹1,675/mo | Full control, best quality |
| GIMP | Free software | Free | Budget-friendly alternative |
| Photopea | Browser-based | Free | No installation needed |
| Canva Pro | Simplified | ₹499/mo | Basic editing + templates |
AI Background Removal
| Tool | Pricing | Features |
| Remove.bg | Free–₹799/mo | Fast background removal |
| Claid.ai | Pay per image | AI enhancement + removal |
| RACHAVO | ₹999–2,499/mo | Ghost mannequin automation |
| Pixelcut | Free–₹599/mo | Mobile + desktop editing |
Learning Resources
YouTube Channels:
- Phlearn (Photoshop tutorials)
- Sleeklens (Product photography)
- Karl Taylor Education (Studio photography)
Online Courses:
- Udemy: "Product Photography Masterclass"
- Skillshare: "Ghost Mannequin Photography"
- YouTube: Free tutorials (search "ghost mannequin technique")
Practice Time: Most sellers become proficient in 2-3 weeks with daily practice.
Real Success Stories
Surat Kurti Wholesaler
Challenge: 500+ kurti designs, model photography cost ₹5,00,000
Solution: Invested ₹12,000 in ghost mannequin setup, learned technique in 3 weeks
Results:
- ✅ Total cost: ₹12,000 (98% savings)
- ✅ Photographed entire catalog in 1 month
- ✅ 45% increase in online sales
- ✅ Amazon bestseller badge on 12 products
- ✅ Now photographs 30+ products daily
Bangalore D2C Clothing Brand
Challenge: Inconsistent product images hurting brand perception
Solution: Implemented standardized ghost mannequin photography for all products
Results:
- ✅ Brand consistency across 200+ SKUs
- ✅ Conversion rate increased 38%
- ✅ Return rate decreased 22%
- ✅ Customer reviews mention "accurate representation"
- ✅ Shopify store revenue up 65%
Mumbai Fashion Startup
Challenge: Limited budget (₹50,000 total for photography)
Solution: DIY ghost mannequin + AI editing tools for faster processing
Results:
- ✅ Photographed 150 products in 3 weeks
- ✅ Professional quality at ₹300/product
- ✅ Successfully launched on Amazon & Myntra
- ✅ Achieved 4.5-star ratings
- ✅ Monthly revenue: ₹8 lakhs in 6 months
Frequently Asked Questions
How long does it take to learn ghost mannequin photography?
2-3 weeks of regular practice to become proficient. First attempts may take 45 minutes per product; experienced photographers complete editing in 10-15 minutes.
Can I do this with a smartphone camera?
Yes, absolutely. Modern smartphones (12MP+) produce excellent results. Use good lighting and tripod for stability. Many successful sellers use only iPhones.
What's the best mannequin type for beginners?
Adjustable dress form with collapsible shoulders. Budget option: ₹2,500-3,500. Look for detachable parts that make dressing easier.
Do I need Photoshop or can I use free software?
GIMP (free) works perfectly well for ghost mannequin editing. Photoshop has more features but isn't mandatory. Photopea is a free browser alternative.
How many products can I photograph per day?
Beginners: 5-10 products
Intermediate: 15-20 products
Experienced: 25-35 products
(Including shooting and editing time)
Is ghost mannequin better than model photography?
Different purposes. Ghost mannequin is better for:
- E-commerce main images
- Catalog consistency
- Budget-conscious sellers
Model photography is better for:
- Lifestyle branding
- Social media campaigns
- Showing product in context
Can I use ghost mannequin for sarees and lehengas?
Challenging but possible. Draping requires skill. Many sellers combine ghost mannequin (blouse) with flat-lay (saree) or use model photography for complex drapes.
What if the garment is too sheer and mannequin shows through?
Use flesh-colored fabric inserts inside the garment or shoot on flesh-colored mannequin and remove it in editing. Some sellers use additional fabric layers.
How do I make the inside neckline look natural?
Perspective matching is key. Shoot the neckline at similar angle to the main garment. Adjust size and rotation during editing to match the garment's perspective.
Should I show both front and back in one image?
No - create separate images for front and back views. Use multiple image slots on marketplace listings. Customers can swipe through views.
🎯 Conclusion
Ghost mannequin photography is no longer a technique reserved for big fashion brands with huge budgets. With basic equipment costing ₹8,000-15,000 and 2-3 weeks of practice, any fashion seller can master this game-changing skill.
Key Takeaways:
✅ Ghost mannequin increases conversions by 38% vs flat-lay photos
✅ Initial investment: ₹8,000-15,000 for complete DIY setup
✅ Cost per product: ₹50-200 after initial investment
✅ Learning time: 2-3 weeks to become proficient
✅ Production capacity: 20-30 products/day when experienced
✅ Marketplace compliant for Amazon, Flipkart, Myntra
✅ Professional brand image at fraction of model photography cost
✅ Scalable solution for growing fashion businesses
Your Action Plan:
Week 1:
- Purchase basic equipment (mannequin, lights, backdrop)
- Set up photography corner in your space
- Practice with 5-10 sample garments
- Watch YouTube tutorials on editing
Week 2:
- Refine shooting technique
- Practice photo editing daily
- Develop consistent workflow
- Create editing templates/presets
Week 3:
- Start photographing actual inventory
- Test images on marketplace listings
- Gather customer feedback
- Optimize based on results
Week 4:
- Scale to full production
- Track conversion rate improvements
- Continue refining quality
- Consider outsourcing editing if needed
The ROI Story:
Traditional Model Photography:
- 100 products × ₹2,000 = ₹2,00,000
- Time: 2-3 months
- Revision cost: High
Ghost Mannequin (DIY):
- Equipment: ₹12,000 (one-time)
- 100 products × ₹100 = ₹10,000
- Total: ₹22,000
- Time: 3-4 weeks
- Revision cost: Zero
Savings: ₹1,78,000 (89% reduction)
For fashion sellers with 100+ products, ghost mannequin photography pays for itself within the first 10 products.
The Bottom Line:
In today's competitive e-commerce landscape, product photography quality directly impacts:
- Search visibility
- Click-through rates
- Conversion rates
- Customer satisfaction
- Return rates
- Brand perception
Ghost mannequin photography gives small sellers the power to compete visually with established brands—without the massive photography budgets.
The question isn't whether you should learn this technique. The question is: How much money are you losing by not using it?
Ready to Transform Your Fashion Photography?
Stop wasting money on repeated photoshoots and start creating professional ghost mannequin images in-house.
Option 1: DIY Approach
Get Started Today:
- Order mannequin and basic lighting
- Download GIMP (free editing software)
- Follow this guide step-by-step
- Practice with 5 sample products
- Scale to full catalog
Option 2: AI-Assisted Solution
Fast-Track Your Results:
👉 Try RACHAVO's Ghost Mannequin Automation
✓ Upload garment photos (on any mannequin)
✓ AI automatically removes mannequin
✓ Combines front + neckline images
✓ Pure white background (RGB 255,255,255)
✓ Marketplace-ready format
✓ Bulk processing available
Visit: www.rachavo.com
Special Offer: First 10 images FREE - No credit card required
Option 3: Professional Service
Want Expert Results Immediately?
Partner with professional ghost mannequin photography services:
- ₹200-500 per product
- 48-hour turnaround
- Guaranteed marketplace compliance
- Perfect for testing before DIY investment
Share this Guide with fashion sellers in your network!