Product Photography Lighting Guide: Master Light for Professional Results
📑 Table of Contents
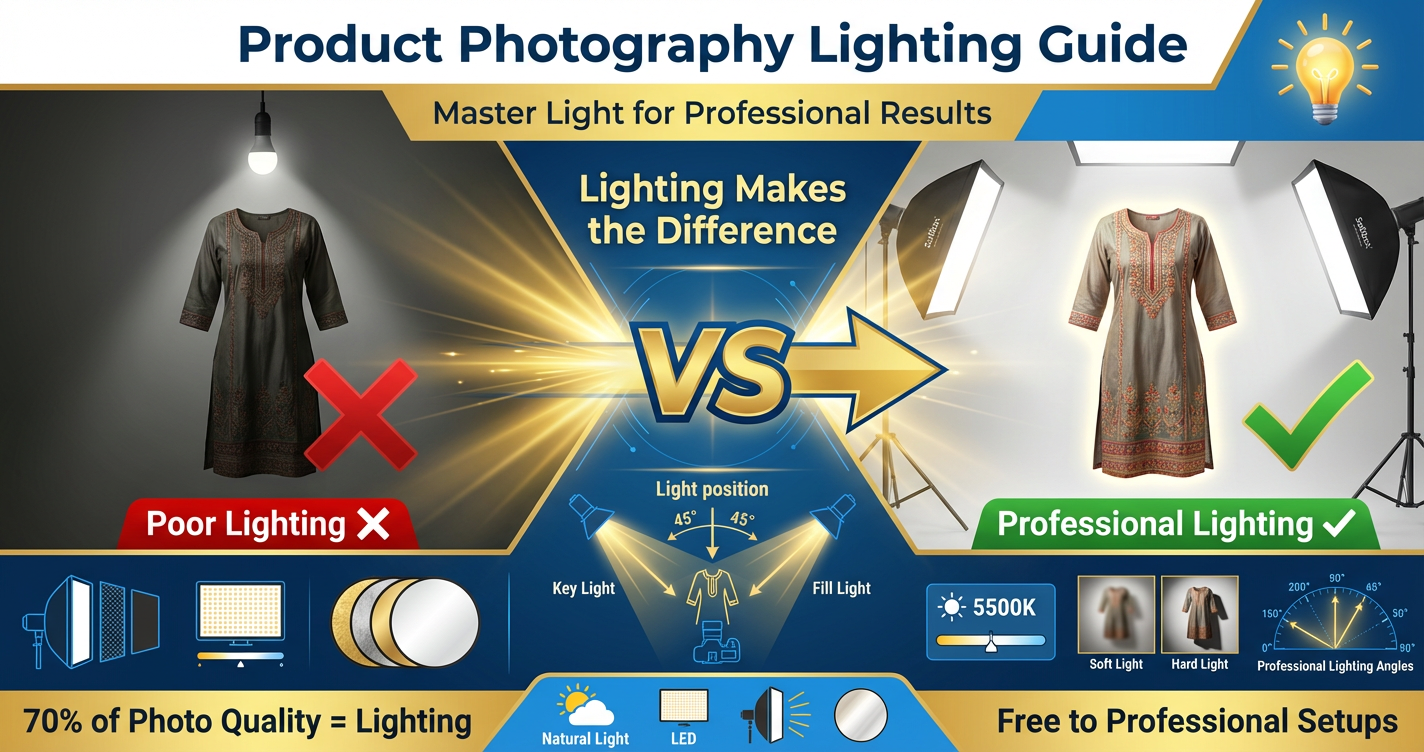
- Why Lighting Makes or Breaks Product Photos
- Understanding Light Basics
- Types of Light Sources
- Essential Lighting Setups
- Lighting Different Product Types
- Common Lighting Problems and Fixes
- Budget Lighting Solutions
- Lighting Checklist
Why Lighting Makes or Breaks Product Photos
Light determines how customers perceive your product quality, colors, and details.
Impact on Product Perception:
1. Detail Visibility
- Good light reveals texture, stitching, embroidery
- Shows quality and craftsmanship
- Builds customer confidence
- Reduces "not as described" returns
2. Color Accuracy
- Correct lighting shows true product colors
- Wrong light creates color casts (yellow, blue, green tints)
- Inaccurate colors = returns and negative reviews
- 45% of returns are due to color mismatch
3. Perceived Value
- Professional lighting = premium perception
- Customers judge quality by photo quality
- Well-lit products justify higher prices
- Flat lighting suggests low quality
Sales Impact:
Conversion Rate:
- Products with professional lighting convert 35-50% better
- Clear detail visibility reduces purchase hesitation
- Accurate colors increase buyer confidence
Return Rate:
- Proper lighting reduces returns by 25-30%
- Shows realistic product appearance
- Manages customer expectations
Pro Tip: 70% of photo quality comes from lighting, only 30% from camera and editing.
Understanding Light Basics
Master these fundamental light properties to control your product photography.
Light Direction:
Front Light (Camera Position):
- Light comes from camera direction toward product
- Effect: Flat, even, minimal shadows
- Use: Main marketplace images, shows product clearly
- Avoid: Can look boring, lacks dimension
Side Light (90° to Product):
- Light from left or right side
- Effect: Creates shadows, shows texture and depth
- Use: Fabric details, dimensional products
- Great for: Showing texture and craftsmanship
Back Light (Behind Product):
- Light behind product, toward camera
- Effect: Creates silhouette or glow around edges
- Use: Creative shots, separation from background
- Careful: Can create silhouette if too strong
Top Light (Overhead):
- Light from directly above
- Effect: Natural, but creates shadows under product
- Use: Flat lays, overhead shots
- Note: Often needs fill light to reduce shadows
45° Angle (Most Versatile):
- Light positioned 45° to side and above
- Effect: Shows dimension while maintaining clarity
- Use: Most product photography (standard setup)
- Why: Balances depth and detail visibility
Light Quality:
Hard Light:
- Characteristics: Sharp, defined shadows
- Source: Small, direct light (sun, bare bulb, spotlight)
- Effect: Dramatic, high contrast
- Use: Jewelry, products with metallic elements
- Avoid: Clothing (shows every wrinkle harshly)
Soft Light:
- Characteristics: Gentle, gradual shadows or no shadows
- Source: Large, diffused light (cloudy sky, softbox, umbrella)
- Effect: Even, flattering, professional
- Use: Clothing, most fashion products
- Preferred: 90% of product photography
How to Soften Light:
- Increase light source size (bigger = softer)
- Diffuse through material (white fabric, paper)
- Bounce off white surface (wall, ceiling, reflector)
- Move light farther from product
- Use softbox or umbrella attachment
Light Intensity:
Bright Light:
- Shows details clearly
- Reduces camera noise (lower ISO needed)
- Can overexpose and blow out whites
- Use for: Most product photography
Dim Light:
- Creates mood and atmosphere
- Requires higher ISO (more noise)
- Risk of blur from slow shutter
- Use for: Lifestyle, creative shots
Balanced Light:
- Product well-exposed
- Background properly lit
- No blown highlights
- No blocked shadows
- Ideal for e-commerce
Color Temperature:
Warm Light (Yellow/Orange Tones):
- Color temperature: 2700K-3500K
- Sources: Incandescent bulbs, sunset, tungsten lights
- Effect: Cozy, traditional feel
- Problem: Makes whites look yellow, colors inaccurate
Cool Light (Blue Tones):
- Color temperature: 5500K-6500K
- Sources: Shade, overcast sky, some LED lights
- Effect: Clean, modern feel
- Problem: Can make warm colors look washed out
Daylight Balanced (Neutral):
- Color temperature: 5000K-5500K
- Sources: Midday sun, daylight-balanced LEDs
- Effect: Natural, accurate colors
- Ideal for: Product photography (most accurate)
Why It Matters:
- Consistent color temperature = consistent product colors
- Mix warm and cool = color correction nightmare
- Use same color temperature for all lights in setup
Types of Light Sources
Each light source has advantages and challenges for product photography.
Natural Light (Free):
Window Light:
- Best: North-facing window (consistent, indirect)
- Time: 10 AM - 3 PM (avoid harsh morning/evening angles)
- Quality: Soft, beautiful, free
- Advantages:
- Zero cost
- Natural-looking results
- Large, soft light source
- Disadvantages:
- Inconsistent (weather, time of day)
- Limited control
- Not available at night
- Directional (one-sided unless bounced)
How to Use:
- Position product 2-3 feet from window
- Turn product to best angle
- Use white reflector opposite window (fills shadows)
- Diffuse with sheer curtain if too harsh
- Shoot during consistent light hours
Best for: Beginners, lifestyle shots, limited budget
LED Panel Lights:
Specifications:
- Power: 20W-50W for product photography
- Color Temperature: Adjustable or daylight (5500K)
- CRI (Color Rendering Index): 90+ for accurate colors
Advantages:
- Consistent, controllable light
- Cool temperature (won't heat products/studio)
- Dimmable (adjust intensity)
- Long-lasting (50,000+ hours)
- Energy efficient
Disadvantages:
- Initial cost
- May need multiple units
- Some cheap LEDs have poor color accuracy
Recommended Setup:
- Two 30W LED panels
- Adjustable stands
- Softbox or diffuser attachment
Best for: Regular product photography, consistent results, studio setup
Ring Lights:
Specifications:
- Diameter: 12"-18" common
- Dimmable with color temperature control
Advantages:
- Shadowless, even frontal light
- Great for small products
- Built-in phone/camera mount
- Portable and easy setup
Disadvantages:
- Creates ring reflection in eyes/shiny surfaces
- Can look flat (minimal depth)
- Limited for larger products
Best for: Jewelry, cosmetics, small accessories, close-up shots
Continuous vs Flash:
Continuous Lights (LED, Tungsten):
- See exactly what you're getting (WYSIWYG)
- Easy for beginners
- Works for photo and video
- Lower power than flash
- Good for product photography
Flash/Strobe:
- Very powerful light
- Freezes motion
- More professional (portrait photography)
- Harder to learn (don't see result until after shot)
- Usually overkill for product photography
- More expensive
Recommendation for Product Photography: Continuous LED lights (easier, sufficient)
Essential Lighting Setups
These proven setups work for 90% of product photography needs.
Setup 1: One-Light + Reflector (Minimum Setup)
Equipment:
- 1 LED panel or window light
- 1 white reflector (foam board)
Positioning:
- Light at 45° to right of product, slightly above
- Reflector at 45° to left, opposite the light
- Reflector bounces light to fill shadows
Result: Soft, dimensional lighting with minimal shadows
Best for: Clothing, most fashion products, beginner setup
Setup 2: Two-Light Setup (Professional Standard)
Equipment:
- 2 LED panels (30W each)
- 2 light stands
- Optional: 2 softboxes/diffusers
Positioning:
Key Light (Main):
- 45° to right of product
- Slightly above product level
- Full intensity (100%)
Fill Light:
- 45° to left of product
- Same height as key light
- Lower intensity (50-60%)
Result: Professional, balanced lighting with controlled shadows
Best for: All products, marketplace images, consistent catalog
Cost: ₹3,500-8,000
Setup 3: Three-Light Setup (Advanced)
Equipment:
- 3 LED panels
- 3 light stands
- Diffusers/softboxes
Positioning:
Key Light:
- 45° right, above product (100% intensity)
Fill Light:
- 45° left, same height (60% intensity)
Back/Hair Light:
- Behind product, aimed at background
- Eliminates background shadows
- Separates product from background
- 70-80% intensity
Result: Professional studio quality, no background shadows, perfect separation
Best for: White background marketplace images, premium products
Cost: ₹5,000-12,000
Setup 4: Natural Light + Reflector (Free Setup)
Equipment:
- Large window (North-facing ideal)
- White foam board or reflector
- Sheer white curtain (diffuser)
Positioning:
- Product 2-3 feet from window
- Window to left or right (not facing)
- Reflector opposite window
- Curtain over window if light too harsh
Time: 10 AM - 3 PM (consistent light)
Result: Beautiful, natural, soft lighting (zero cost)
Best for: Beginners, lifestyle shots, natural aesthetic
Lighting Different Product Types
Different products need different lighting approaches.
Clothing (Kurtis, Sarees, Dresses):
Goal: Show fabric texture, color accuracy, drape
Lighting:
- Soft, diffused light (avoid harsh shadows)
- Two-light setup (key + fill)
- 45° angles from both sides
- Even illumination (no strong shadows in fabric folds)
Avoid:
- Hard light (shows every wrinkle aggressively)
- Single light (creates harsh shadows)
- Top light only (shadows under folds)
Special Tip:
- For white/light fabrics: Slightly underexpose to maintain detail
- For dark fabrics: Add extra light, slight overexposure
Jewelry and Reflective Products:
Goal: Show sparkle without harsh reflections
Lighting:
- Soft, diffused light (large softbox or light tent)
- Avoid hard, direct light (creates hot spots)
- Multiple small lights better than one strong light
- Light tent ideal
Setup:
- 45° lighting from both sides
- White background to bounce light around product
- Camera slightly above product (reduces reflections)
Avoid:
- Direct flash or bare bulb (harsh reflections)
- Dark backgrounds (absorb light, make lighting harder)
Bags and Leather Products:
Goal: Show texture, structure, craftsmanship
Lighting:
- Moderate contrast (shows texture)
- Side lighting at 45° (reveals material texture)
- Fill light to prevent overly dark shadows
- Slight hard light okay (brings out leather grain)
Setup:
- Key light 45° right
- Fill light or reflector left
- Slightly stronger shadows than clothing (shows dimension)
Flat Lay Photography:
Goal: Even overhead lighting, no shadows
Lighting:
- Two lights at 45° on both sides
- Same intensity (balanced)
- No shadows in frame
- Consider overhead light box for perfect evenness
Setup:
- Camera directly above product
- Lights at 45° from both sides, aimed down
- Equal distance from product
- Equal intensity
Common Lighting Problems and Fixes
Identify and solve these frequent lighting issues.
Problem 1: Harsh Shadows
Cause: Hard, direct light source too close
Fix:
- Diffuse light (softbox, white fabric, umbrella)
- Increase light source size
- Move light farther away
- Add fill light or reflector to lighten shadows
Problem 2: Flat, Lifeless Photos
Cause: Too much even light, no shadows at all
Fix:
- Reduce fill light intensity (create some shadows)
- Remove one light (single light + reflector)
- Increase contrast in lighting
- Add dimension with slight shadows
Problem 3: Color Cast (Yellow, Blue, Green Tint)
Cause: Mixed color temperatures or incorrect white balance
Fix:
- Use same color temperature for all lights (5500K)
- Set camera white balance to match lights
- Avoid mixing daylight + tungsten
- Correct in editing (adjust white balance)
Problem 4: Blown Out Highlights (Pure White Areas)
Cause: Overexposure, light too intense
Fix:
- Reduce light intensity (dim LEDs)
- Move lights farther away
- Add diffusion to soften
- Adjust camera exposure compensation (-0.3 to -0.7)
Problem 5: Product Too Dark
Cause: Insufficient light or camera settings
Fix:
- Add more light or increase intensity
- Move lights closer
- Use reflectors to bounce more light
- Increase exposure compensation (+0.3 to +0.7)
- Check ISO isn't too low
Problem 6: Visible Hot Spots (Bright Reflections)
Cause: Hard light on reflective surfaces
Fix:
- Diffuse light source (larger, softer)
- Change light angle
- Use light tent for small reflective products
- Polarizing filter on camera lens (advanced)
Problem 7: Uneven Background
Cause: Background not lit separately, shadows on backdrop
Fix:
- Add third light aimed at background
- Increase distance between product and background
- Use sweep background (shadows fall behind)
- Overexpose background slightly
Problem 8: Can't See Details in Dark Products
Cause: Insufficient light on dark surfaces (black absorbs light)
Fix:
- Significantly increase light intensity
- Move lights closer
- Use multiple reflectors
- Slight overexposure (correct in editing)
- Use white background to bounce extra light
Budget Lighting Solutions
Professional lighting doesn't require professional budget.
FREE Options:
Natural Window Light:
- Cost: ₹0
- Quality: Excellent
- Limitation: Time and weather dependent
DIY Reflector:
- White foam board
- Aluminum foil on cardboard
- White bedsheet hung on frame
- Mirror for extra light
DIY Diffuser:
- Sheer white curtain
- White bedsheet
- Butter paper (for small lights)
- Tracing paper
Total FREE Setup: Window + DIY reflector + DIY diffuser = ₹0-500
Budget Setup:
Equipment:
- 2× LED desk lamps with daylight bulbs
- 2× Daylight CFL/LED bulbs 20W
- 2× Foam board reflectors
- 1× White backdrop (chart paper/foam)
- DIY light diffusers
- Basic tripod
Results: Professional-looking images for most products
Mid-Range Setup :
Equipment:
- 2× LED panel lights 30W
- 2× Light stands
- 2× Softboxes
- 1× White reflector
- Seamless white backdrop paper
Results: Professional studio-quality lighting, consistent results
Professional Setup:
Equipment:
- 3× Professional LED panels 50W
- 3× Professional light stands
- 2× Large softboxes
- 1× Hair light/background light (included above)
- Professional reflector set
- Backdrop system with stand
Results: Professional commercial-level lighting for all products
ROI Calculation:
Investment: ₹5,000 mid-range lighting setup
Returns:
- 30% better conversion = 30 extra sales per 100 visitors
- Average order value ₹800 × 30 orders = ₹24,000 extra revenue
- With 25% margin = ₹6,000 profit
- ROI in first month from improved photos
Lighting Checklist {#checklist}
Before Every Shoot:
- All lights same color temperature (5500K daylight)
- Lights positioned at correct angles
- Light intensity set (key 100%, fill 50-60%)
- Diffusers/softboxes attached
- Reflectors positioned
- Background evenly lit (no shadows)
- Test shot taken and reviewed
- White balance set correctly on camera
During Shoot:
- Product evenly lit (no harsh shadows)
- No hot spots or blown highlights
- Colors look accurate on camera screen
- Details visible in shadows and highlights
- Background pure white/even
- No unwanted reflections
- Consistent lighting across all products in batch
Review Checklist:
- Product colors accurate (match real product)
- Texture and details clearly visible
- No harsh shadows distracting from product
- Proper exposure (not too dark, not too bright)
- White background actually white (RGB 255,255,255)
- Consistent look across all product images
- Professional appearance
Conclusion
Lighting is the foundation of great product photography. Master it, and your products will stand out in crowded marketplaces.
Key Takeaways:
✅ Light quality matters more than quantity (soft, diffused light beats harsh bright light)
✅ Two-light setup is the sweet spot (professional results, reasonable cost)
✅ Consistency is crucial (same color temperature, same setup for all products)
✅ Natural light works beautifully (free, soft, but limited to daytime)
✅ Budget solutions deliver results (₹2,000-5,000 setup produces professional images)
Your Lighting Journey:
Start Here (This Week):
- Use natural window light + DIY reflector
- Shoot during 10 AM - 3 PM
- Practice positioning light at 45° angles
- Cost: Free to ₹500
Level Up (This Month):
- Invest in 2× LED panel lights (₹2,500-5,000)
- Add light stands and diffusers
- Create permanent studio setup
- Cost: ₹5,000-8,000
Go Professional (Next Quarter):
- Three-light setup with softboxes
- Backdrop system
- Professional accessories
- Cost: ₹15,000-25,000
Remember: Professional photographers spend years mastering light. But with these fundamentals, you can create professional results in weeks.
Your products deserve to be seen in the best light—literally. Start implementing these lighting techniques today.
Want perfect lighting without the setup? AI-powered photography tools can simulate professional studio lighting on your existing photos—adding dimension, removing harsh shadows, and creating consistent professional results across your entire catalog.