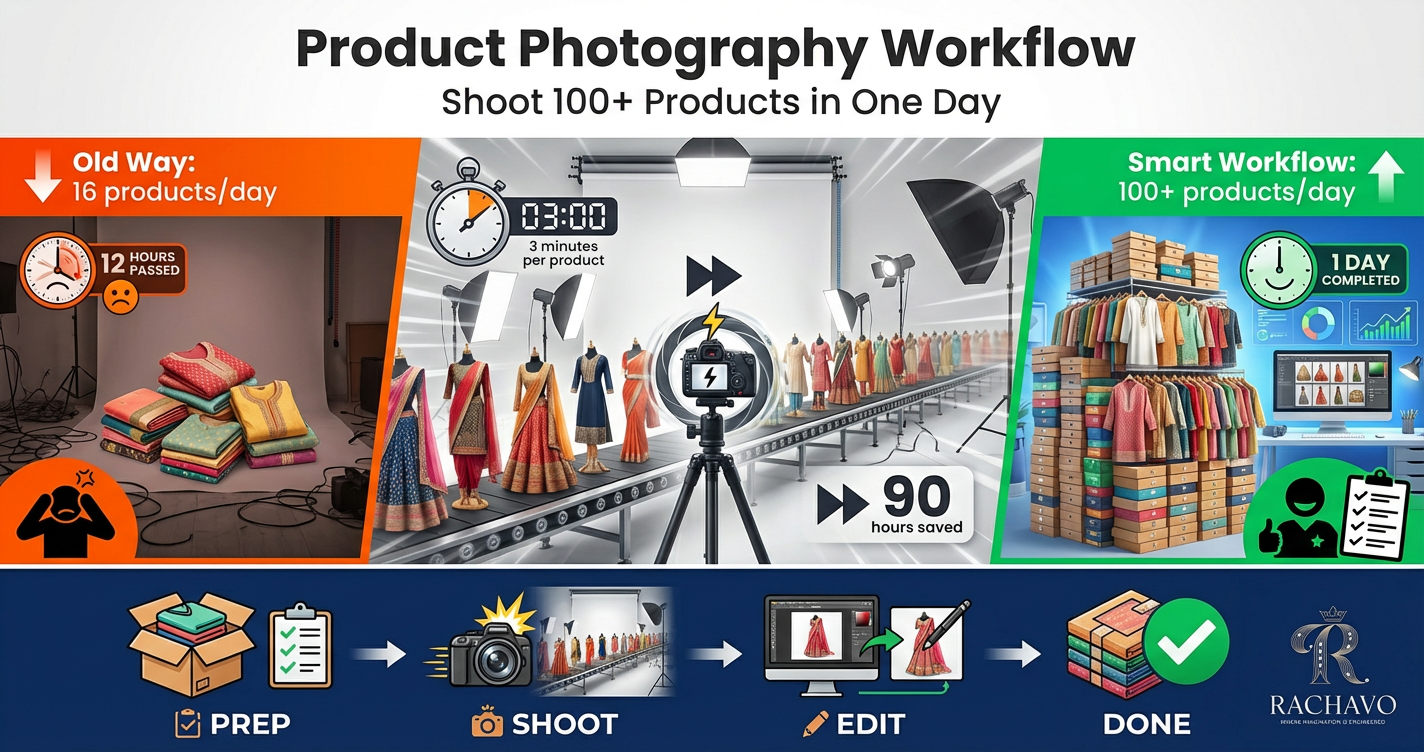
Product Photography Workflow: How to Shoot 100+ Products in One Day
📑 Table of Contents
- Why Workflow Matters More Than Equipment
- Pre-Shoot Preparation (The 80/20 Rule)
- Setting Up Your Production Line
- The Batch Photography System
- Shooting Different Product Types Efficiently
- Post-Production Workflow
- Quality Control and Organization
- Workflow Optimization Tools
- Your 100-Product Day Schedule
Why Workflow Matters More Than Equipment
Most sellers focus on cameras and lighting. Professionals focus on systems.
The Math of Efficiency:
Amateur Approach:
- Setup: 15 minutes per product
- Shooting: 10 minutes per product
- Review and adjust: 5 minutes per product
- Total: 30 minutes per product
- Products per 8-hour day: 16 products
Professional Workflow:
- Setup once: 60 minutes total
- Shooting: 3 minutes per product (batched)
- Minimal adjustment (consistent setup)
- Total: 3-4 minutes per product
- Products per 8-hour day: 100-120 products
The difference isn't talent—it's system.
Cost Impact:
Time Investment:
- 200 products × 30 min = 100 hours (12.5 days)
- 200 products × 3 min = 10 hours (1.25 days)
- Time saved: 90 hours
Financial Impact:
- 90 hours × ₹500/hour opportunity cost = ₹45,000 saved
- Faster time-to-market = earlier revenue
- More time for business growth activities
Quality Benefits:
Consistent Workflow Creates:
- ✅ Uniform image quality across catalog
- ✅ Brand consistency (same look and feel)
- ✅ Fewer reshoots (get it right first time)
- ✅ Professional appearance
- ✅ Customer trust (polished brand image)
Pre-Shoot Preparation (The 80/20 Rule)
80% of your efficiency comes from 20% of your preparation. Here's what matters.
Step 1: Product Preparation (Day Before)
Organize Products:
By Category:
- Group similar items (all kurtis together, all sarees, all accessories)
- Shoot same category in batch
- Reduces setup changes
By Size:
- Small products first (less mannequin changes)
- Medium products next
- Large products last
By Color:
- Light colors first (white, pastels)
- Dark colors later (prevent lint transfer)
- Reduces cleaning between shots
Physical Preparation:
- Steam/Iron all clothing (wrinkles waste time during shoot)
- Lint roll every fabric item
- Clean all products (dust, fingerprints, price tags removed)
- Check quality (loose threads, damage)
- Prepare accessories (jewelry, props, styling items)
- Tag each product (SKU visible but removable)
Pro Tip: Dedicate previous afternoon to product prep. Never prep during photoshoot—pure time waste.
Step 2: Equipment Setup Checklist
Photography Station:
- Camera/phone fully charged (+ backup battery)
- Memory cards empty and ready (minimum 64GB)
- Tripod positioned and locked
- Backdrop installed (seamless paper rolled out or backdrop hung)
- All lights positioned and tested
- Reflectors placed
- Props organized and accessible
- Steamer plugged in and ready
Styling Station:
- Mannequin(s) ready
- Pins, clips, styling tools organized
- Hangers available
- Mirror for quick checks
- Product queue area designated
Review Station:
- Laptop/tablet for image review
- Fast memory card reader
- Backup external drive
- Folder structure pre-created
- Editing software ready
Step 3: Create Shot List Template
Standard Images for Each Product:
Fashion/Clothing:
- Front view (main image)
- Back view
- Side view
- Detail close-up (fabric/embroidery)
- Styled/lifestyle (if applicable)
Total: 5 shots × 3 angles each = 15 clicks per product
Accessories:
- Main product view
- Different angle
- Detail/texture
- Scale/size reference
- Packaging (if relevant)
Standardization = Speed
Step 4: Camera Settings Pre-Programmed
Save These Settings as Preset:
For White Background Products:
- Mode: Manual
- ISO: 200
- Shutter: 1/125
- Aperture: F/8
- White Balance: 5500K
- Format: RAW + JPEG
- Image Size: Maximum
- Color Space: sRGB
For Lifestyle Shots:
- Mode: Aperture Priority
- ISO: 400
- Aperture: F/2.8-4 (shallow depth)
- White Balance: Auto or match lighting
- Format: RAW + JPEG
Lock and Save: Don't change settings between products in same batch
Step 5: Workspace Organization
Three-Zone Setup:
Zone 1: Preparation Area
- Products waiting to be shot
- Organized by shooting order
- Styling tools nearby
Zone 2: Shooting Area
- Camera on tripod
- Lighting positioned
- Backdrop ready
- No clutter
Zone 3: Completed Products
- Shot products organized
- Keep separated from un-shot items
- Ready for packing/storage
Flow: Zone 1 → Zone 2 → Zone 3 (one direction, no backtracking)
Setting Up Your Production Line
Think assembly line, not artisan studio.
Lighting Setup (Once for Entire Batch)
Goal: Light setup that works for all products in category
Standard Two-Light Setup:
Key Light (Main):
- Position: 45° to right of product
- Height: Slightly above product
- Distance: 4-5 feet
- Intensity: Full power
Fill Light:
- Position: 45° to left of product
- Height: Same as key light
- Distance: 5-6 feet
- Intensity: 60% of key light
Optional Back Light:
- Position: Behind product, aimed at backdrop
- Purpose: Eliminates background shadows
- Intensity: Medium
Test and Lock:
- Shoot one sample product
- Review lighting
- Adjust if needed
- Lock all lights in position (tape floor marks)
- Don't touch again for entire batch
Backdrop Setup (Permanent for Day)
Seamless Backdrop:
- White seamless paper (most versatile)
- Roll down 6-8 feet
- Curve from wall to floor (sweep)
- Tape or weight down front edge
- Smooth any wrinkles
Backdrop Marks:
- Mark product position with tape (small "X" on backdrop)
- Ensures consistent framing
- Speeds up product placement
Camera Positioning (Fixed)
Tripod Setup:
- Height: Depends on product (waist-level for clothing on mannequin)
- Distance: Allows 85% frame fill
- Level: Use bubble level or grid
- Lock everything tight
- Mark tripod leg positions on floor
Framing:
- Use camera grid
- Align mannequin/product to same position each time
- Leave consistent space around product
- Frame once, repeat for all products
Mannequin/Display Setup
For Clothing:
- Use professional dress form/mannequin
- Adjust to standard size
- Pin clothes to fit perfectly from front
- Back doesn't matter if using ghost mannequin technique
Multiple Mannequins Strategy:
- Mannequin 1: Actively shooting
- Mannequin 2: Being styled with next product
- Alternate between them (no shooting downtime)
Product Staging Assembly Line
Batch Dressing:
- Have assistant/team member dress next product while you shoot current
- Queue 3-5 products ready to shoot
- Continuous flow, no waiting
The Batch Photography System
Batch similar tasks to eliminate context-switching.
Batch 1: All Main Images (White Background)
Process:
- Set up white background lighting
- Position mannequin/product stand
- Lock camera settings
- Shoot ONLY main images for ALL products
Workflow:
- Product on mannequin
- Position in marked spot
- Camera auto-focus on product
- Shoot 3-5 frames
- Quick review (exposure, focus)
- Next product
- Repeat without changing anything
Time: 2-3 minutes per product
Result: 100 main images in 3-4 hours
Batch 2: All Back Views
Process:
- Rotate mannequin 180°
- OR reposition camera behind
- Keep lighting same
- Shoot ONLY back views for ALL products
Time: 1-2 minutes per product
Result: 100 back images in 2-3 hours
Batch 3: Detail Shots
Setup Change:
- Move camera closer OR use macro/zoom
- Adjust lighting if needed (closer, softer)
- Shoot ONLY detail shots for ALL products
Focus:
- Embroidery
- Fabric texture
- Stitching quality
- Brand labels
Time: 2 minutes per product
Batch 4: Lifestyle/Styled Shots (If Needed)
Setup:
- Change to lifestyle background
- Adjust lighting for scene
- Add props
- Shoot lifestyle for ALL relevant products
Note: Not all products may need lifestyle—batch only those that do
Why Batching Works:
Eliminates:
- ❌ Repeated setup/breakdown
- ❌ Setting changes between shots
- ❌ Mental context switching
- ❌ Forgotten shots
Creates:
- ✅ Rhythm and flow
- ✅ Consistent quality
- ✅ Predictable timing
- ✅ Fewer mistakes
Shooting Different Product Types Efficiently
Each product type needs specific workflow optimizations.
Clothing (Kurtis, Sarees, Lehengas):
Challenges:
- Wrinkles appear quickly
- Difficult to show drape and flow
- Size variations
Efficient Solutions:
Ghost Mannequin Technique:
- Dress invisible mannequin
- Shoot front (mannequin visible in shot)
- Remove mannequin digitally in post OR use AI tools
- Or use actual invisible mannequin (₹3,000-8,000)
Batch by Size:
- All Size S together (one mannequin adjustment)
- All Size M together
- Minimizes mannequin size changes
Steamer On-Set:
- Quick touch-up between shots
- Don't let wrinkles slow you down
- 30-second steam vs 5-minute re-iron
Time per Piece: 3-4 minutes (main + back + detail)
Jewelry and Small Accessories:
Challenges:
- Very small (hard to photograph)
- Reflective surfaces
- Need to show details
Efficient Solutions:
Jewelry Stand/Display:
- Pre-position multiple pieces on stand
- Shoot in sequence
- Move stand, not camera
Macro Setup:
- Dedicated macro station
- Close-up lighting preset
- Shoot all jewelry in one batch
Light Tent:
- Small light tent (24" cube)
- Even, diffused light
- Eliminates harsh reflections
- Drop in product, shoot, repeat
Multiple in Frame:
- For small items, shoot 2-3 at once if selling as set
- Saves setup time
Time per Piece: 1-2 minutes
Bags and Footwear:
Challenges:
- Need multiple angles
- Show structure and dimension
- Interior shots
Efficient Solutions:
Turntable Method:
- Place product on lazy susan/turntable
- Shoot front
- Rotate 90° (shoot side)
- Rotate 90° (shoot back)
- Rotate 90° (shoot other side)
- No camera or lighting changes
Interior Shots:
- Batch all "open bag" shots together
- Use clip light inside bag to illuminate
- Show functionality
Structured Display:
- Stuff bags with tissue to maintain shape
- Use shoe inserts to keep form
- Batch all structuring first, then shoot
Time per Item: 4-5 minutes (multiple angles)
Home Decor and Flat Items:
Challenges:
- Flat lay photography
- Overhead shooting angle
- Styling for context
Efficient Solutions:
Overhead Rig:
- Mount camera directly above
- Use wide-angle lens
- Shoot straight down
Surface Styling:
- Prepare styled surface (wood background, props)
- Place products on marked spots
- Shoot sequence without changing setup
Time per Item: 2-3 minutes
Post-Production Workflow
Editing 100+ products requires systematic approach.
Immediate Actions (During Shoot):
Quick Review:
- After each product, review on camera
- Check: Focus, exposure, framing
- Reshoot immediately if problem (product still set up)
- Don't wait until end of day
Batch Naming:
- Rename files immediately after each batch
- Use SKU or product code
- Example: "KUR001_MAIN", "KUR001_BACK", "KUR001_DETAIL"
Batch Editing System:
Step 1: Import and Organize
Folder Structure:
📁 Product_Shoot_2025-01-15/
📁 RAW_Files/
📁 Edited/
📁 Batch_01_Kurtis/
📁 Batch_02_Sarees/
📁 Batch_03_Accessories/
📁 Final_Export/
📁 Marketplace_Ready/
📁 Social_Media/
Step 2: Create Master Edit
Process:
- Select best image from first product
- Edit to perfection:
- Crop to 2000x2000px
- Adjust exposure
- White balance correction
- Background to pure white (RGB 255,255,255)
- Sharpening
- Color correction
- Save editing steps as PRESET
Step 3: Batch Apply Preset
Software Options:
Lightroom:
- Import all similar images
- Apply preset to all
- Sync adjustments across batch
- Individual tweaks if needed (5-10% of images)
Photoshop Actions:
- Record action for first image
- Batch process entire folder
- Automated background removal, resizing, etc.
Free Tools:
- GIMP (Batch processing)
- XnConvert (Batch resize, format)
Time: 30-60 seconds per image (vs 5-10 minutes manual)
Background Removal at Scale:
Manual Method:
- Too slow for 100+ products
- Only for complex/problem images
AI Tools (Recommended):
- Remove.bg: Bulk upload, automatic removal
- Photoroom: Batch background removal
- Slazzer: API for automation
- RACHAVO: Fashion-specific, perfect for clothing
Workflow:
- Export all images
- Bulk upload to AI tool
- Download pure white background versions
- Quality check
- Use originals for any failures
Time: 10-20 minutes for 100 products (vs 8+ hours manual)
Quality Control Check:
Automated Checks:
- File size (all between 200KB-2MB)
- Dimensions (all 2000x2000px)
- Color space (all sRGB)
- Format (all JPEG)
Visual Spot Check:
- Review 10% randomly
- Check for editing consistency
- Verify white balance accuracy
- Ensure no cropping issues
Final Export Settings:
Marketplace Images:
- Format: JPEG
- Dimensions: 2000 x 2000 pixels
- Quality: 90%
- Color Space: sRGB
- File Naming: SKU-based
Social Media:
- Format: JPEG
- Dimensions: 1080 x 1080 pixels (Instagram)
- Quality: 85-90%
- Color Space: sRGB
Batch Export:
- Export all marketplace versions in one batch
- Export all social media versions in another batch
- Saves hours vs individual exports
Quality Control and Organization {#quality-control}
Maintaining quality while working fast requires systems.
Shot Checklist (During Shoot):
For Each Product:
- Main image sharp and in focus
- Product fills 85%+ of frame
- No visible wrinkles or defects
- Background clean (no dust, lint)
- Lighting consistent with previous products
- All required angles captured
- SKU/product code documented
File Naming Convention:
System:
[CATEGORY]_[SKU]_[ANGLE]_[VERSION].jpg
Examples:
- KURTI_KUR001_MAIN_V1.jpg
- KURTI_KUR001_BACK_V1.jpg
- KURTI_KUR001_DETAIL_V1.jpg
- SAREE_SAR045_MAIN_V1.jpg
Benefits:
- Instant identification
- Easy searching
- Batch processing friendly
- Professional organization
Tracking Sheet:
Use Spreadsheet to Track:
| SKU | Product Name | Shot Date | Main | Back | Detail | Lifestyle | Edited | Uploaded | Notes |
| KUR001 | Blue Cotton Kurti | 15-Jan | ✓ | ✓ | ✓ | ✓ | ✓ | ✓ | Perfect |
| KUR002 | Red Silk Kurti | 15-Jan | ✓ | ✓ | ✓ | X | ✓ | Pending | Reshoot lifestyle |
Benefits:
- Know exactly what's done
- Identify missing shots
- Track progress
- Plan reshoots
Backup System:
3-2-1 Rule:
- 3 copies of all files
- 2 different storage types (hard drive + cloud)
- 1 off-site backup
Immediate Backup:
- End of shooting day: Copy all RAW files to external drive
- End of editing: Upload finals to cloud (Google Drive, Dropbox)
Never delete memory card until backup confirmed
Workflow Optimization Tools
Invest in tools that multiply your efficiency.
Photography Tools:
Essential:
- Tripod with quick-release plate (₹1,500-4,000)
- Remote shutter/timer (₹200-800)
- Light meter app (free on phone)
- Memory card reader (₹300-1,000)
Professional:
- Tethered shooting cable (₹800-2,000): Preview on laptop in real-time
- Multiple memory cards (swap while one uploads)
- Second camera body (shoot while one transfers)
Styling Tools:
Time-Savers:
- Garment steamer (₹1,500-5,000): Faster than iron
- Lint roller (₹100-300): Always within reach
- Dressing pins (₹50-200): Quick fitting
- Clamps and clips (₹200-500): Hold fabric in place
Software Tools:
Batch Editing:
- Adobe Lightroom (₹800/month): Industry standard, powerful presets
- Capture One (Professional alternative)
- Darktable (Free, open-source Lightroom alternative)
Background Removal:
- Remove.bg (Free basic, ₹699/month unlimited)
- Photoroom (₹399/month)
- RACHAVO (Fashion-specific AI)
Automation:
- Zapier/IFTTT: Automate file organization
- Hazel (Mac) or DropIt (Windows): Auto-organize files by rules
- Photoshop Actions: Record repetitive tasks
Organization Tools:
File Management:
- Adobe Bridge (Free with Creative Cloud): Visual file browser
- XnView: Free image organizer
- Google Drive/Dropbox: Cloud backup and sharing
Project Management:
- Notion/Trello: Track shooting schedule
- Google Sheets: Product tracking
- Asana: Team collaboration (if working with others)
Time-Tracking:
Track Where Time Goes:
- Toggl (Free): Time tracking
- RescueTime: Automatic activity tracking
Why: Identify bottlenecks, optimize workflow further
Your 100-Product Day Schedule
Here's the exact timeline for shooting 100 products efficiently.
Day Before (Preparation):
3:00 PM - 6:00 PM:
- Collect all products to be shot
- Steam/iron all items
- Lint roll and clean
- Organize by category and shooting order
- Check all equipment
- Charge batteries
Shoot Day:
8:00 AM - 9:00 AM: Setup (1 hour)
- Install backdrop
- Position and test lighting
- Set up camera on tripod
- Lock all settings
- Test shoot 5 sample products
- Verify and adjust
- Prep first 10 products
9:00 AM - 12:00 PM: Batch 1 - Main Images (3 hours)
- Shoot 100 main images
- 1.5-2 minutes per product
- Quick review after each
- No setup changes
- 15-minute break at 10:30 AM
12:00 PM - 1:00 PM: Lunch Break
- Quick backup of morning shots
- Quick review on laptop
1:00 PM - 3:30 PM: Batch 2 - Back Views & Details (2.5 hours)
- Shoot 100 back view images
- Shoot 100 detail images
- Batched together
- 1.5 minutes per product
- 15-minute break at 2:15 PM
3:30 PM - 5:00 PM: Batch 3 - Additional Angles (1.5 hours)
- Side views
- Alternate angles
- Special shots
- 1 minute per product
5:00 PM - 6:00 PM: Review and Backup (1 hour)
- Final review all images
- Identify any reshoots needed
- Backup all files (external drive + cloud)
- Organize files and rename
- Document completed products
- Clean and pack equipment
Total: 9 hours (including breaks)
Result: 300-500 images of 100 products
Post-Production Day:
Next Day (or outsource):
9:00 AM - 11:00 AM: Import and Organize
- Import to editing software
- Organize into folders
- Create naming convention
11:00 AM - 1:00 PM: Master Edit + Preset
- Edit first product perfectly
- Create preset
- Test on 5 more products
- Refine preset
1:00 PM - 2:00 PM: Lunch
2:00 PM - 4:00 PM: Batch Apply Edits
- Apply preset to all images
- Batch background removal (AI tools)
- Quick quality check
4:00 PM - 5:30 PM: Spot Corrections
- Individual fixes for 10-15% that need it
- Final adjustments
5:30 PM - 6:00 PM: Export and Upload
- Batch export all images
- Upload to marketplace
- Update listings
- Final backup
Conclusion
Photographing 100+ products in a day isn't about working harder—it's about working systematically.
Key Success Factors:
✅ 80% of efficiency is preparation (product prep, equipment setup, workflow planning)
✅ Batch everything (same task repeatedly, not switching contexts)
✅ Lock your setup (don't touch camera/lights once dialed in)
✅ Use automation (presets, AI tools, batch processing)
✅ Track and improve (identify bottlenecks, optimize continuously)
Your First 100-Product Shoot:
Week 1: Prepare
- Organize 100 products
- Create shot list template
- Set up permanent photography station
- Test workflow with 10 products
Week 2: Execute
- Prep day (clean, steam, organize)
- Shoot day (follow schedule above)
- Edit and upload
Week 3: Optimize
- Review what worked
- Identify time wasters
- Refine workflow
- Document process
Remember: Your first 100-product day might take longer. That's normal. By your third or fourth batch, you'll hit the timing. The system works—trust the process.
Stop photographing products one at a time. Start building a production system.
Your entire catalog can be shot, edited, and online in days, not months. The workflow is here. Now execute.
Need to skip the entire workflow? AI-powered photography platforms can transform your product catalog into professional, marketplace-ready images with multiple angles, white backgrounds, and lifestyle shots—without a single photoshoot.